
In our final step we will set up some basic material editing.
State
You know the drill.
const state = {
  server: {
    host: 'localhost',
    port: 8080,
    secure: false
  },
  scene_filename: 'scenes/meyemii.mi',
  scene_name: 'meyemii',
  app_scope_name: 'tutorial',
  session_scope_name: `scope_${RS.Utils.create_random_string(8)}`,
  render_loop_name: `render_loop_${RS.Utils.create_random_string(8)}`,
  last_mouse: { x: 0, y: 0 },
  material_name: 'material_under_test'
};
We added the name of the material we want to update. This does of course hard code this tutorial to only work on the meyemii scene. However to be truly dynamic we would need to query all the MDL materials instances in the scene then provide a mechanism to choose which material to edit. Then we would need to know which arguments are available on the material, and what their types are so it all explodes out of the scope of a simple tutorial pretty quickly.
UI
For simplicity we'll just add a row of buttons that, when clicked, will change the object's color to a predefined value.
<img id="rendered_image" width="400" height="400"/>
<div class="button-row">
  <button class="gold" id="gold" onclick="set_color(0.2, 0.135, 0.0463, 'gold')">gold</button>
  <button class="silver" id="silver" onclick="set_color(0.753, 0.753, 0.753, 'silver')">silver</button>
  <button class="rose" id="rose" onclick="set_color(0.718, 0.431, 0.475, 'rose')">rose</button>
  <button class="copper" id="copper" onclick="set_color(0.722, 0.451, 0.2, 'copper')">copper</button>
</div>
We also add some CSS at the top to make things look pretty:
<script src="../../lib/realityserver.js"></script>
<style>
  .button-row {
    display:flex;
    max-width:400px;
  }
  .button-row button {
    flex: auto;
  }
  .gold {
    background-color:#ffac3b;
  }
  .silver {
    background-color:#c0c0c0;
  }
  .rose {
    background-color:#b76e79;
  }
  .copper {
    background-color:#b87333;
  }
</style>
Changing the color
We only need to modify the existing JavaScript in one location. This is to localize the material so we are the only ones to see the changes. Update the in scene_loaded command queue as follows:
// localize the camera to the session scope
.queue(new RS.Command('localize_element', { element_name: state.scene.camera }))
.queue(new RS.Command('localize_element', { element_name: state.scene.camera_instance }))
.queue(new RS.Command('localize_element', { element_name: `${state.scene_name}::${state.material_name}` }))
Note the material name is being prefixed with the scene name due to the import prefix.
The set_color function is called to change the actual color. It's arguments are the RGB values to change to (in linear floating point 0->1 format, all RealityServer® colors are represented in this way) and the id of the button that was pressed.
function set_color(r, g, b, name) {
  const button = document.getElementById(name);
  button.firstChild.textContent = 'setting';

  state.stream.pause();

  const [ response, available ] = state.stream.send_command(
    new RS.Command('mdl_set_argument',
      {
        element_name: `${state.scene_name}::${state.material_name}`,
        argument_name: 'metal_color',
        value: { r, g, b }
      }),
    {
      want_response: true,
      wait_for_render: true
    }
  );
  let set_error = false;
  response.then(result => {
    if (result instanceof RS.Command_error) {
      set_error = true;
    }
  });
  available.then(image_data => {
    state.stream.resume();
    button.firstChild.textContent = set_error ? 'failed' : 'set';
    setTimeout(() =>
      button.firstChild.textContent = name,
    2000);
  });
}
On the surface this looks just like the previous command execution patterns. However there are some subtle but important differences.
state.stream
We are not adding commands to the service here but to the stream. The stream provides the same command execution functionality as the service. However commands executed on the stream are automatically executed in the scope of the render loop so there is no need add a use_scope call (unless you want to execute in a different scope of course). In most use cases you want to execute commands in the render loop scope so this automated scoping is very useful.
state.stream.send_command
Since we're only executing one command we don't need to create a command queue. Both the stream and the service provide send_command and execute_command functions that only accept a single command. Also note we have called send_command rather than execute_command, this distinction will be important later.
new RS.Command('mdl_set_argument',
    {
      element_name: `${state.scene_name}::${state.material_name}`,
      argument_name: 'metal_color',
      value: { r, g, b }
    })
This command sets the metal_color argument of the MDL material instance specified in element_name to the provided color. Again we prefix the name with the import prefix. Maybe we should have just done that in the state.
const [ response, available ] = state.stream.send_command(
  ...
  {
    want_response: true,
    wait_for_render: true
  }
);
When executing commands on the stream the 2nd argument takes a different set of options than on the service. In addition to want_response there are options to control execution behaviour on the render loop and the stream specific wait_for_render. Setting wait_for_render causes an additional Promise to be returned that will resolve when the first image that contains this commands effects is available. So we can wait not only for the command response, but for the image that contains the response as well.
send_command is functionality identical to execute_command (as is send and execute on RS.Command_queue) except that the send variant returns an array of Promises rather than a single Promise that resolves to multiple values. Using send allows us to react in a more fine grained manner than simply waiting for everything to complete.
let set_error = false;
response.then(result => {
  if (result instanceof RS.Command_error) {
    set_error = true;
  }
});
Since response is a Promise we can use then to process the command result. In this case we simply want to track whether the color change was successful or not. There's no reason to expect this to fail unless you've loaded a different scene that doesn't contain the hardcoded material name, or if it doesn't have the metal_color argument.
const button = document.getElementById(name);
button.firstChild.textContent = 'setting';

state.stream.pause();

const [ response, available ] = state.stream.send_command(

...

available.then(image_data => {
  state.stream.resume();
  button.firstChild.textContent = set_error ? 'failed' : 'set';
  setTimeout(() =>
    button.firstChild.textContent = name,
  2000);
});
The above handles the wait_for_render Promise. Before command execution we change the text on the pressed button to setting, this is to let the user know that the change is currently being made. We also call RS.Stream#pause on the stream. This stops the stream from emitting RS.Stream#event:image events until RS.Stream#resume is called. We do this so that the user doesn't see any intermediate images that might be rendered while our change is being made.
The available Promise will resolve once the command has been executed, a render has been performed with the updated scene (IE: a render that contains the new color) and the render has been pushed to the client and is ready to display. So in it's then function we resume rendering. In the next tick the RS.Stream#event:image event for this image will be emitted and the image displayed. We are also updating the button text to indicate whether the edit worked or not, and 2 seconds later setting it back to the previous value.
In summary, pressing one of the color buttons triggers the following sequence:
- Set button label to 'setting'
- Pause display of rendered images
- Send command to change the material color
responsePromise resolves, record whether the color change worked or not.availablePromise resolves when a rendered image is available with the change.- Resume rendering on the stream.
- Set button label indicating whether the change worked or not.
imageevent is emitted with the first rendered image with the change. It is displayed and status updated.- 2 seconds later, button label reverts back to original.
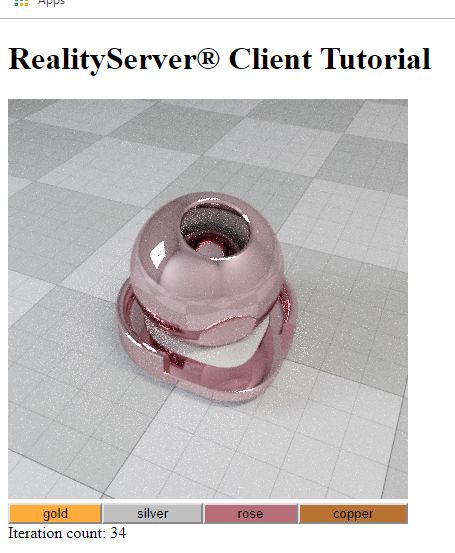
Now load your page and hit the rose button and you should get something like the following:
Summary
In this tutorial we have learnt about executing commands on the stream, the difference between sending and executing commands, how to edit materials and controlling the display of images.
Source
The complete source for this tutorial can be found below:
If you have a local checkout and a running RealityServer® you can load the tutorial below:
| <<< Moving the Camera | Node.js >>> |