
The first step any application needs to do is load the library and connect to a RealityServer® instance. The library module can be loaded directly from unpkg.com at https://unpkg.com/@migenius/realityserver-client@1.0.3 or you can distribute it yourself. For these tutorials we are distributing it locally.
Loading
The first step is some simple boiler plate HTML to load the library and display a helpful heading.
<!DOCTYPE html>
<html>
<head>
  <title>RealityServer® Client Tutorial</title>
  <meta charset="UTF-8">
  <script src="../../lib/realityserver.js"></script>
</head>
<body>
  <div width="400">
    <h1>RealityServer® Tutorial</h1>
  </div>
</body>
</html>
Not much to see here and nothing too unexpected.
Status
We're going to want to be able to get status information from the system for debugging and progress purposes. So we'll add another div to contain any text we want to display
<div width="400">
  <h1>RealityServer® Client Tutorial</h1>
  <div>
    <span id="status" />
  </div>
</div>
We need to be able to populate the status with something so we'll add our first piece of JavaScript in the <head> block
<script src="../../lib/realityserver.js"></script>
<script type="text/javascript">
  function set_status(status) {
    document.getElementById('status').firstChild.textContent = status;
  }
</script>
Create the RealityServer® interface
Now we are ready to start working with RealityServer®. The imported module provides a global object RS that contains all the required functionality The main entry point is the RS.Service class so we need to create an instance of that.
<script type="text/javascript">
  const service = new RS.Service();

  function set_status(status) {
    document.getElementById('status').firstChild.textContent = status;
  }
</script>
Note that from now on we're just going to assume that all JavaScript goes into the initial <script> tag so will omit that for clarity.
We also need a state object to keep track of what our application is doing.
const state = {
  server: {
    host: 'localhost',
    port: 8080,
    secure: false
  }
};
For now this just contains the connection details of the RealityServer® we are connecting to. You should modify these to match your installation. In a real world application these details would be provided by some resource management system or, if your pages are being served from the RealityServer® instance that will also be performing rendering, you can use RS.Utils#extract_url_details to get this information.
Connecting
Now we have everything we need to connect. A simple start function is all that is needed.
async function start() {
  set_status('Connecting');
  try {
    const url = `${(state.server.secure ? 'wss' : 'ws')}://${state.server.host}:${state.server.port}/service/`;
    await service.connect(url);
    set_status(`Connected to RealityServer at: ${url}`);
  } catch (err) {
    set_status(`Failed to connect to RealityServer: ${err.toString()}`);
  }
}
As we are using an async/await pattern this function is defined with the async keyword. We first set the status to 'connecting' and construct the URL to connect to from our state data. All communications are performed using WebSockets so a ws or wss scheme is used depending on whether a secure connection is required or not. The path used is /service/ which is the standard WebSocket endpoint for RealityServer®
This URL is passed into RS.Service#connect and we await the response. If we could not connect an error will be thrown otherwise execution continues and sets a success status.
Or it would if any of the above code was called. Unless we call the start function nothing is going to happen so update the body tag as below:
<body onload="start();">
Now load your page and you should get something like the following:
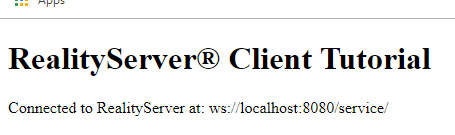
If not check your state.server settings and make sure they are correct. Check that you can connect over HTTP using a web browser to RealityServer® directly and that you have CORS enabled if necessary.
A note on rejection
The RealityServer® Client API is primarily promise based. Promise rejections will always reject with an instance of RS.Error.
Summary
In this tutorial we have learnt how to load the client library and connect to a RealityServer® instance. The next tutorial covers loading a scene in preparation for rendering.
Source
The complete source for this tutorial can be found below:
If you have a local checkout and a running RealityServer® you can load the tutorial below:
| <<< Browser | Scene Loading >>> |